VPN Setup
For the VPN we’re using Wireguard VPN for it’s simplicity, speed and security!
The nice bonus is that it’s also cross-platform!
The download page is at: https://www.wireguard.com/install/ if you want to skip some steps and just get it setup yourself.
And for Linux you should be able to find it in your favorite package manager.
The VPN setup depends on your OS, please pick the one you’re using:
If you just need some help, check Troubleshooting
Windows
Before you begin, make sure to have done the following:
- Saved your Wireguard configuration you received via Welcome email somewhere you can find it later (like the Desktop!)
- Downloaded the Wireguard client from: https://download.wireguard.com/windows-client/wireguard-installer.exe
The installation procedure is simple, just open the installer and proceed through the prompts with all defaults.
Once the installation is done, open the Wireguard manager application, you should be able to find it either on your Desktop or find it when searching in the Start Menu.
You should see a window like this:
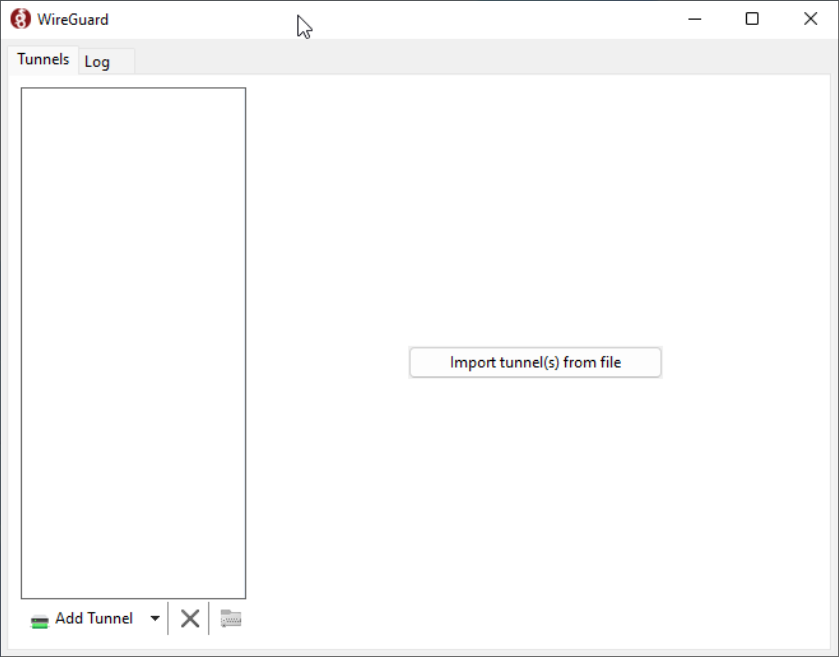
Click the “Import tunnel(s) from file” in the middle-right of the window or the “Add Tunnel” in the bottom-left of the window, that will open a file selector.
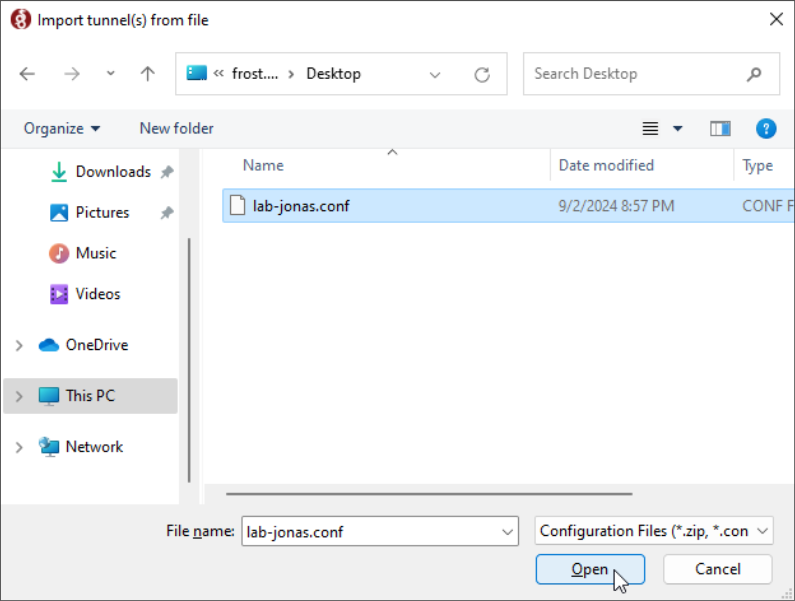
Navigate to where you saved the Wireguard configuration from your welcome email, select it and Open!
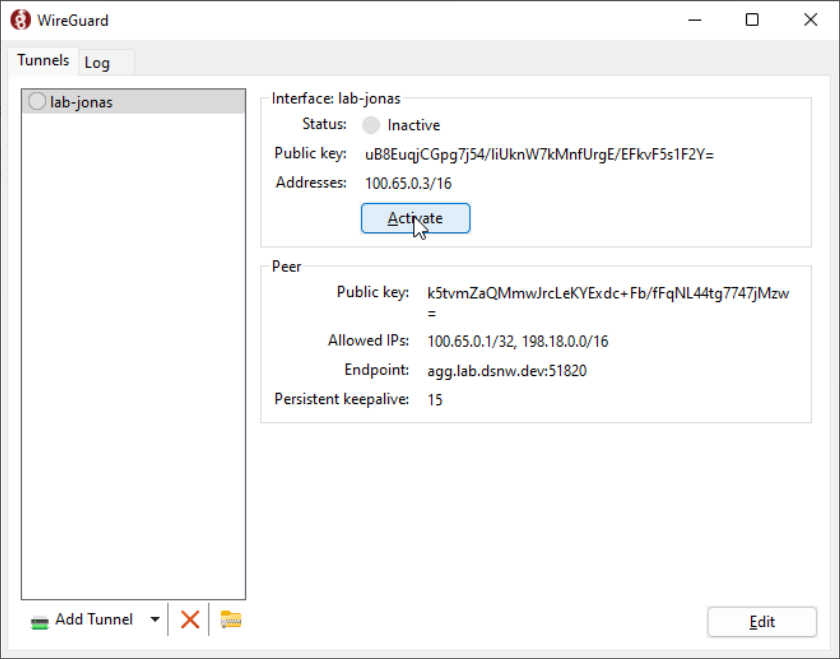
If you do not see any error message pop up, everything was successful and you can proceed to activation!
Finally, with the configuration imported, you can activate the VPN.
Just select it in the VPN list if it’s not selected already, and click Activate
If the VPN is active, you should see a green shield now appear on the VPN:
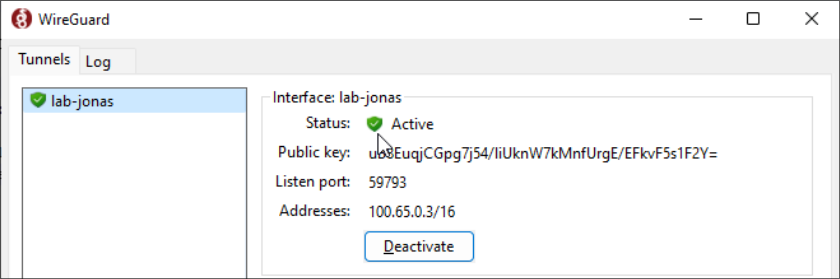
If you want to verify connectivity, try pinging 198.18.0.1 or 100.65.0.1 and if you receive pings back, you’re ready to use your lab environment!
If something didn’t go according to plan, check the troubleshooting section.
Mac OS
NOTE: I don’t have a Mac unfortunately, so I can’t provide screenshots, but the procedure should be very similar to Windows
Before you begin, make sure to have done the following:
- Saved your Wireguard configuration you received via Welcome email somewhere you can find it later (like the Desktop!)
Installation is simple, you can do it either through:
- Appstore (Recommended)
- Or if you’re using brew (this will be CLI only and not covered in this guide):
brew install wireguard-tools
Once installed, you should find it under your Applications
A window should appear, if it didn’t at the very least a new tray icon should be present. You can click on it and click “Manage tunnels” and the click on the “+” button in the bottom left of the window. Or just proceed directly to “Import tunnel(s) from file…” from the tray icon menu.
Navigate to the location where you saved your Wireguard configuration from the welcome email and open it.
Once imported, simply select the VPN in the menu and check “Status” checkmark at the bottom of the window.
The bubble near the VPN connection name should be green and you can verify connectivity by pinging 100.65.0.1 or 198.18.0.1.
If you receive responses to your pings, everything is working properly!
If something didn’t go according to plan, check the troubleshooting section.
Linux
Before you begin, make sure to have done the following:
- Saved your Wireguard configuration you received via Welcome email somewhere you can find it later (like the Desktop!)
Installation is simple, just install the package wireguard-tools with your package manager available for your distribution.
A few examples below (all require root):
- Debian / Ubuntu
apt update && apt install wireguard-tools - Arch Linux
pacman -Syy wireguard-tools - Fedora / CentOS / Rocky / Alma
dnf install wireguard-toolsYou can always find your specific instruction here
After installed, place the Wireguard configuration in the /etc/wireguard/ directory. This will require root as well.
So for example, my config is named lab-jonas.conf and currently it’s located in Downloads in my home directory, I would copy it like this:
sudo cp ~/Downloads/lab-jonas.conf /etc/wireguard/
After that simply run:
sudo wg-quick up <filename without conf>
With the earlier example in mind, for me the command would be:
sudo wg-quick up lab-jonas
If everything goes well, you should now be connected to the VPN, you can verify that by checking ip a s to see a new interface,
you can also simply type wg in the terminal to see a bit more detailed output on the tunnel itself.
And to verify connectivity, ping 100.65.0.1 or 198.18.0.1 and if you see pings back, everything is working properly!
If something didn’t go according to plan, check the troubleshooting section.
Troubleshooting
If something errored out or didn’t work properly, check these common troubleshooting steps:
- “My configuration file didn’t import” - Make sure you’re selecting the correct file, make sure the contents don’t look corrupt.
The Wireguard configuration file is a simple text file, it should open in any text editor. If it doesn’t or it looks corrupted something is wrong and you might need to re-download the file.
A snippet of how a Wireguard configuration file looks:
[Interface]
Address = 100.65.0.2/16
PrivateKey = <redacted>

[Peer]
Endpoint = voyager.stk.dsnw.dev:51820
PublicKey = KrSb2okowxH0QQEf2VqRbPfgoXyq1Q/0IOBWGWqF4jU=
AllowedIPs = 100.65.0.1/32,198.18.0.0/16
PersistentKeepalive = 15
- “Installation failed for Wireguard” - Make sure you have admin rights to your computer, if everything looks correct, try re-downloading the installer and make sure it’s appropriate for your operating system and CPU architecture (X86/AMD64 vs ARM)
- “Pinging 100.65.0.1 or 198.18.0.1 doesn’t produce any responses” - Those IP addresses will only be active if the VPN is, so make sure after importing the VPN configuration you have properly activated it.
If everything seems correct, try rebooting your computer just in case some networking parameters got stuck.\ - “I can’t access my VM, it doesn’t respond to pings or SSH” - Make sure the VM has a floating IP associated with it (it should start with 198.18.x.x prefix). If it does, make sure the security group allows the connection that you’re making.
The default security group does not allow external connectivity. - “Yesterday everything was working and today it’s not, I haven’t changed anything!” - While the VPN in most cases will reconnect automatically, it might not across reboots/sleeps. So just double check that the VPN is active and if not, activate it.
You don’t need to import it again, simply activate it/turn it on. - “I’ve tried everything here and nothing helps” - it’s possible your configuration is incorrect or got corrupted while being sent.
Let your teacher know and he’ll work with the appropriate people to resolve it.