Welcome!
Welcome! If you’re here, you’re a VERY proud user of the Dark Snow Lab environment!
Here you can find information about the basics of the environment, some basic tips, configs and potentially starter guides. This will improve over time, so check back and if you want to see something added feel free to contact your teacher in charge and he will pass that feedback onto me!
Let’s start with the simple things:
- URL: https://lab.dsnw.dev
- If you want the Horizon Dashboard: https://lab.dsnw.dev/horizon
- This is publicly accessible from anywhere (including your CI/CD)
- Any floating IPs/public IPs are only accessible via VPN.
- If something doesn’t appear to be working (like ping or SSH) double check that your VPN is active
- If the VPN appears to be working, double check your security group rules
- Networks in Openstack by default are private and are only accessible from within the network
- Meaning any basic setup of Openstack intended for external communication needs to have a Network, Subnet and Router that is both connected to the subnet and has an external IP added.
- If you are using a company issued device or a device with restricted permissions, make sure you have proper exceptions or admin rights to install additional software (mainly just the VPN to access VMs)
- If your IT staff needs information what IPs are sent over VPN, we’re doing a split tunnel only 100.65.0.0/16 and 198.18.0.0/16 ranges.
If there are any questions that are not answered in these Wiki pages, your first point of contact is your teacher.
Any concerns with the platform itself he will bring up with us, to avoid any massive floods of support requests.
Before diving in, make sure you have the credentials to access the lab environment!
If you’re ready, let’s kick off -> VPN setup
If you need to get your RC file for API/Terraform -> Openstack RC File
If you are trying to request SSL certificates for the domain you’ve setup in Openstack -> DNS Based SSL certificates
If you need a short starter to Terraform with Openstack -> Terraform w/ Openstack
VPN Setup
For the VPN we’re using Wireguard VPN for it’s simplicity, speed and security!
The nice bonus is that it’s also cross-platform!
The download page is at: https://www.wireguard.com/install/ if you want to skip some steps and just get it setup yourself.
And for Linux you should be able to find it in your favorite package manager.
The VPN setup depends on your OS, please pick the one you’re using:
If you just need some help, check Troubleshooting
Windows
Before you begin, make sure to have done the following:
- Saved your Wireguard configuration you received via Welcome email somewhere you can find it later (like the Desktop!)
- Downloaded the Wireguard client from: https://download.wireguard.com/windows-client/wireguard-installer.exe
The installation procedure is simple, just open the installer and proceed through the prompts with all defaults.
Once the installation is done, open the Wireguard manager application, you should be able to find it either on your Desktop or find it when searching in the Start Menu.
You should see a window like this:
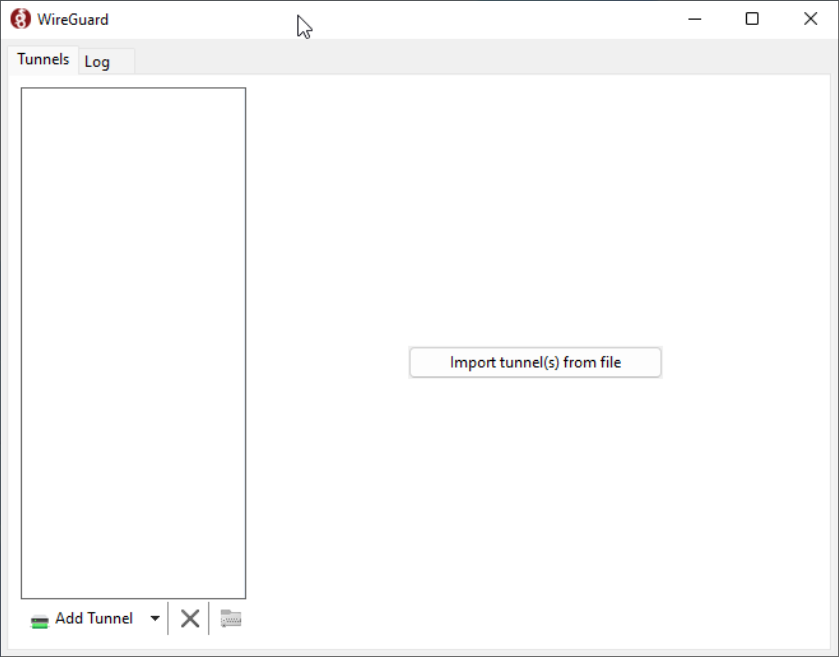
Click the “Import tunnel(s) from file” in the middle-right of the window or the “Add Tunnel” in the bottom-left of the window, that will open a file selector.
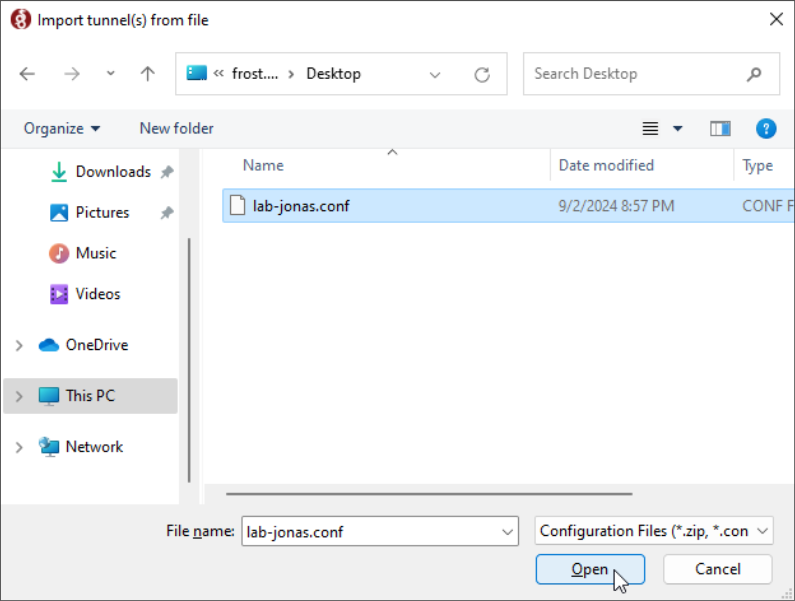
Navigate to where you saved the Wireguard configuration from your welcome email, select it and Open!
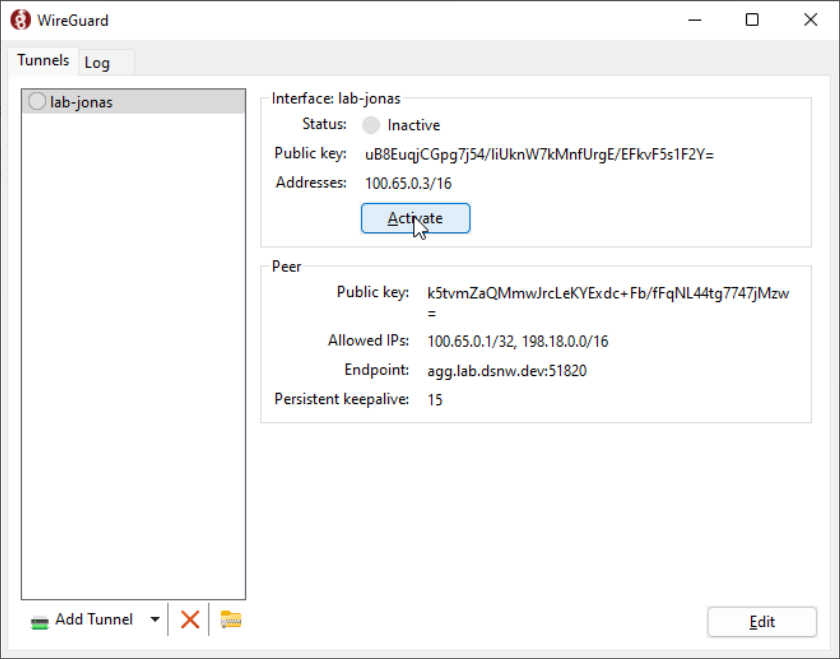
If you do not see any error message pop up, everything was successful and you can proceed to activation!
Finally, with the configuration imported, you can activate the VPN.
Just select it in the VPN list if it’s not selected already, and click Activate
If the VPN is active, you should see a green shield now appear on the VPN:
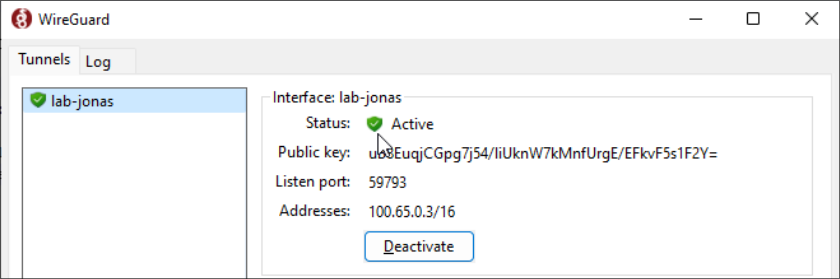
If you want to verify connectivity, try pinging 198.18.0.1 or 100.65.0.1 and if you receive pings back, you’re ready to use your lab environment!
If something didn’t go according to plan, check the troubleshooting section.
Mac OS
NOTE: I don’t have a Mac unfortunately, so I can’t provide screenshots, but the procedure should be very similar to Windows
Before you begin, make sure to have done the following:
- Saved your Wireguard configuration you received via Welcome email somewhere you can find it later (like the Desktop!)
Installation is simple, you can do it either through:
- Appstore (Recommended)
- Or if you’re using brew (this will be CLI only and not covered in this guide):
brew install wireguard-tools
Once installed, you should find it under your Applications
A window should appear, if it didn’t at the very least a new tray icon should be present. You can click on it and click “Manage tunnels” and the click on the “+” button in the bottom left of the window. Or just proceed directly to “Import tunnel(s) from file…” from the tray icon menu.
Navigate to the location where you saved your Wireguard configuration from the welcome email and open it.
Once imported, simply select the VPN in the menu and check “Status” checkmark at the bottom of the window.
The bubble near the VPN connection name should be green and you can verify connectivity by pinging 100.65.0.1 or 198.18.0.1.
If you receive responses to your pings, everything is working properly!
If something didn’t go according to plan, check the troubleshooting section.
Linux
Before you begin, make sure to have done the following:
- Saved your Wireguard configuration you received via Welcome email somewhere you can find it later (like the Desktop!)
Installation is simple, just install the package wireguard-tools with your package manager available for your distribution.
A few examples below (all require root):
- Debian / Ubuntu
apt update && apt install wireguard-tools - Arch Linux
pacman -Syy wireguard-tools - Fedora / CentOS / Rocky / Alma
dnf install wireguard-toolsYou can always find your specific instruction here
After installed, place the Wireguard configuration in the /etc/wireguard/ directory. This will require root as well.
So for example, my config is named lab-jonas.conf and currently it’s located in Downloads in my home directory, I would copy it like this:
sudo cp ~/Downloads/lab-jonas.conf /etc/wireguard/
After that simply run:
sudo wg-quick up <filename without conf>
With the earlier example in mind, for me the command would be:
sudo wg-quick up lab-jonas
If everything goes well, you should now be connected to the VPN, you can verify that by checking ip a s to see a new interface,
you can also simply type wg in the terminal to see a bit more detailed output on the tunnel itself.
And to verify connectivity, ping 100.65.0.1 or 198.18.0.1 and if you see pings back, everything is working properly!
If something didn’t go according to plan, check the troubleshooting section.
Troubleshooting
If something errored out or didn’t work properly, check these common troubleshooting steps:
- “My configuration file didn’t import” - Make sure you’re selecting the correct file, make sure the contents don’t look corrupt.
The Wireguard configuration file is a simple text file, it should open in any text editor. If it doesn’t or it looks corrupted something is wrong and you might need to re-download the file.
A snippet of how a Wireguard configuration file looks:
[Interface]
Address = 100.65.0.2/16
PrivateKey = <redacted>

[Peer]
Endpoint = voyager.stk.dsnw.dev:51820
PublicKey = KrSb2okowxH0QQEf2VqRbPfgoXyq1Q/0IOBWGWqF4jU=
AllowedIPs = 100.65.0.1/32,198.18.0.0/16
PersistentKeepalive = 15
- “Installation failed for Wireguard” - Make sure you have admin rights to your computer, if everything looks correct, try re-downloading the installer and make sure it’s appropriate for your operating system and CPU architecture (X86/AMD64 vs ARM)
- “Pinging 100.65.0.1 or 198.18.0.1 doesn’t produce any responses” - Those IP addresses will only be active if the VPN is, so make sure after importing the VPN configuration you have properly activated it.
If everything seems correct, try rebooting your computer just in case some networking parameters got stuck.\ - “I can’t access my VM, it doesn’t respond to pings or SSH” - Make sure the VM has a floating IP associated with it (it should start with 198.18.x.x prefix). If it does, make sure the security group allows the connection that you’re making.
The default security group does not allow external connectivity. - “Yesterday everything was working and today it’s not, I haven’t changed anything!” - While the VPN in most cases will reconnect automatically, it might not across reboots/sleeps. So just double check that the VPN is active and if not, activate it.
You don’t need to import it again, simply activate it/turn it on. - “I’ve tried everything here and nothing helps” - it’s possible your configuration is incorrect or got corrupted while being sent.
Let your teacher know and he’ll work with the appropriate people to resolve it.
Openstack RC File
Openstack RC File (also referred to as “openrc” file) is a helper script that helps you setup the necessary environment variables to use with Openstack CLI or Terraform.
Openstack GUIs like Horizon and Skyline both offer the ability to download a personalized RC file for your user/project.
To do that, first login to Skyline or Horizon with your credentials.
Skyline
In the top right of the screen click on your username, and select “Get OpenRC File”
Pick the “Password type”
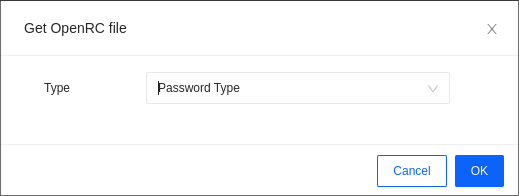
After clicking “OK” should start downloading a file name “openrc.sh”
Horizon
In the top right of the screen click on your username, and select “Openstack RC File”
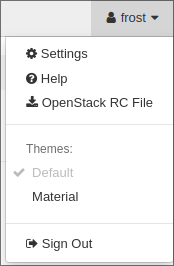
It should start downloading a file name “<username>-openrc.sh”
Usage
Whether you download the RC File through Skyline or Horizon, usage is the same:
source /path/to/rc/file
It will prompt you for your user password (the same one you used to login to Horizon/Skyline) and after entering it’ll save all the variables as environment ones.
You can verify using the export command and look for variables that have OS_ as the prefix.
Now you’re ready to execute some Openstack CLI commands, for example: openstack image list
If you get errors like “HTTP 401”, it usually means your credentials are incorrect. Run the source script again and re-enter your password.
If the error is “HTTP 403”, this means you don’t have access to resource, so make sure you’re allowed to run the command that you are running.
DNS Management
The lab environment has a few DNS zones available for use.
This allows you to create DNS records pointing to floating IP addresses, to be able to use a hostname in your browser instead of an IP address.
Unfortunately the UI elements for it are unstable and don’t show up properly, so you can only configure them through CLI/Terraform.
There are a few zones available in the environment, you can list them with openstack zone list CLI command:
$ openstack zone list
+--------------------------------------+----------------------+---------+------------+--------+--------+
| id                                   | name                 | type    |     serial | status | action |
+--------------------------------------+----------------------+---------+------------+--------+--------+
| c422c757-bdb6-457a-9a6d-7db256bf91c3 | iths.dsnw.dev.       | PRIMARY | 1770909070 | ACTIVE | NONE   |
| bb520124-cd96-4278-8bea-4f9aa626be90 | iths.darkclouds.xyz. | PRIMARY | 1771276799 | ACTIVE | NONE   |
+--------------------------------------+----------------------+---------+------------+--------+--------+
iths.dsnw.devis an SSL-only DNS zone, meaning to use it in the browser for your webapp, it must be over HTTPSiths.darkclouds.xyzwill support both HTTP and HTTPS use, so this one is recommended
Below, will be examples of how to create DNS records with the CLI and Terraform:
CLI
In this example, we want to point the domain jonas.iths.darkclouds.xyz to my floating IP 198.18.1.151
We need to create a record set, with a record type A, TTL 30 seconds, the ID is used from the earlier openstack zone list command:
openstack recordset create --record 198.18.1.151 --type A --ttl 30 bb520124-cd96-4278-8bea-4f9aa626be90
+-------------+--------------------------------------+
| Field       | Value                                |
+-------------+--------------------------------------+
| action      | CREATE                               |
| created_at  | 2026-02-16T23:23:22.000000           |
| description | None                                 |
| id          | 51d52599-15f8-45b6-bd41-e78f3aff7556 |
| name        | jonas.iths.darkclouds.xyz.           |
| project_id  | 8dab02a02b1644d3a46431bbe5a71346     |
| records     | 198.18.1.151                         |
| status      | PENDING                              |
| ttl         | 30                                   |
| type        | A                                    |
| updated_at  | None                                 |
| version     | 1                                    |
| zone_id     | bb520124-cd96-4278-8bea-4f9aa626be90 |
| zone_name   | iths.darkclouds.xyz.                 |
+-------------+--------------------------------------+
Make sure to replace the name and the floating IP to your own!
We can verify whether the record exists with the following command:
openstack recordset list bb520124-cd96-4278-8bea-4f9aa626be90
+--------------------------------------+----------------------------+------+----------------------------------------------------------------+--------+--------+
| id                                   | name                       | type | records                                                        | status | action |
+--------------------------------------+----------------------------+------+----------------------------------------------------------------+--------+--------+
| 7972213c-e7e0-4191-89ed-edd96a7586c2 | iths.darkclouds.xyz.       | SOA  | ns.lab.dsnw.dev. admin.0x00.lt. 1771284206 3555 600 86400 3600 | ACTIVE | NONE   |
| f334ca6a-866b-4507-b96d-c86b4abb787f | iths.darkclouds.xyz.       | NS   | ns.lab.dsnw.dev.                                               | ACTIVE | NONE   |
| 51d52599-15f8-45b6-bd41-e78f3aff7556 | jonas.iths.darkclouds.xyz. | A    | 198.18.1.151                                                   | ACTIVE | NONE   |
+--------------------------------------+----------------------------+------+----------------------------------------------------------------+--------+--------+
Keep in mind, this list will include records created by other students! Look for yours in the list and the status should be active.
You can also verify from your host by trying to ping the domain like so:
ping jonas.iths.darkclouds.xyz
PING jonas.iths.darkclouds.xyz (198.18.1.151) 56(84) bytes of data.
^C
--- jonas.iths.darkclouds.xyz ping statistics ---
1 packets transmitted, 0 received, 100% packet loss, time 0ms
We can see our domain has been successfully resolved to our floating IP address! Once your application is running, you can access it over your domain name, instead of the IP like so: http://jonas.iths.darkclouds.xyz
Again, make sure to replace it with your own DNS name of choice!
Finally if you’d like to remove it, you need to use the Zone ID and your Record ID as argument, like so:
openstack recordset delete bb520124-cd96-4278-8bea-4f9aa626be90 51d52599-15f8-45b6-bd41-e78f3aff7556
+-------------+--------------------------------------+
| Field       | Value                                |
+-------------+--------------------------------------+
| action      | DELETE                               |
| created_at  | 2026-02-16T23:23:22.000000           |
| description | None                                 |
| id          | 51d52599-15f8-45b6-bd41-e78f3aff7556 |
| name        | jonas.iths.darkclouds.xyz.           |
| project_id  | 8dab02a02b1644d3a46431bbe5a71346     |
| records     | 198.18.1.151                         |
| status      | PENDING                              |
| ttl         | 30                                   |
| type        | A                                    |
| updated_at  | 2026-02-16T23:31:15.000000           |
| version     | 2                                    |
| zone_id     | bb520124-cd96-4278-8bea-4f9aa626be90 |
| zone_name   | iths.darkclouds.xyz.                 |
+-------------+--------------------------------------+
Terraform
Terraform works similarly, here’s an example code:
data "openstack_dns_zone_v2" "iths-darkclouds-xyz" {
  name = "iths.darkclouds.xyz."
}

resource "openstack_dns_recordset_v2" "jonas-iths-darkclouds-xyz" {
  zone_id     = data.openstack_dns_zone_v2.iths-darkclouds-xyz.id
  name        = "jonas.iths.darkclouds.xyz."
  ttl         = 30
  type        = "A"
  records     = ["198.18.1.151"]
}
Note the dots at the end of values for name in both resources!
You can also reference floating IP resources in records value directly:
data "openstack_dns_zone_v2" "iths-darkclouds-xyz" {
  name = "iths.darkclouds.xyz."
}

resource "openstack_dns_recordset_v2" "jonas-iths-darkclouds-xyz" {
  zone_id     = data.openstack_dns_zone_v2.iths-darkclouds-xyz.id
  name        = "jonas.iths.darkclouds.xyz."
  ttl         = 30
  type        = "A"
  records     = [openstack_networking_floatingip_v2.tf-vm-1-fip.address]
}
Terraform verifies the record by itself, but you can still use ping or openstack recordset list command to verify it’s existence!
SSL Certificate generation
You might’ve realized that since the Lab environment is accessible solely through VPN, requesting certificates from Let’s Encrypt might be difficult/impossible.
It’s true, by default Let’s Encrypt uses the HTTP-01 challenge which either runs a small webserver or puts special challenge files on the server, that Let’s Encrypt can check for through the domain. If it finds them, domain ownership is proved and SSL certificate is issued.
In our case Let’s Encrypt can’t access our VMs that are in a VPN, so we have to use an alternative challenge based on DNS-01.
Here’s more information about how the different challenges work: https://letsencrypt.org/docs/challenge-types/
To request certificates for your Lab VMs, you need a few pre-requisites:
- An individually issued “TSIG Key” (you should find it in your welcome email). This will be used to update DNS records and prove domain ownership through DNS.
- Certbot (or an alternative webserver that handles key requests for you like Caddy) for certificate requests
Below are example with Certbot and Caddy with Caddyfile
Certbot
First make sure you have Certbot installed, most of the time it’s available as certbot package in your package manager.
And the RFC2136 plugin for Certbot, in debian it’s called python3-certbot-dns-rfc2136
Create a file called lab-creds.ini somewhere secure, as this will be a file holding secrets.
The file should contain the following content:
dns_rfc2136_server = 65.109.59.61
dns_rfc2136_port = 5355
dns_rfc2136_name = <username>.
dns_rfc2136_secret = <tsig key>
dns_rfc2136_algorithm = HMAC-SHA256
dns_rfc2136_sign_query = false
Make sure to replace <username> and <tsig key> with values from your welcome email.
Take note that there is a dot after the username, it’s important, keep it there.
Since it’s a sensitive file, Certbot requires secure permissions on it, execute the following:
chmod 600 /path/to/lab-creds.ini
After creating the file with the specified content and permissions, you can request a certificate with the following command:
certbot certonly --dns-rfc2136 --dns-rfc2136-credentials /path/to/lab-creds.ini -d <domain name>
Replace the path with an appropriate one and <domain name> with the domain name you’re requesting a certificate for!
Here’s an example output where the lab-creds.ini file is located in my current directory:
debian@testtt:~$ sudo certbot certonly --dns-rfc2136 --dns-rfc2136-credentials ./lab-creds.ini -d tttt.ffff.lab.dsnw.dev
Saving debug log to /var/log/letsencrypt/letsencrypt.log
Requesting a certificate for tttt.ffff.lab.dsnw.dev
Waiting 60 seconds for DNS changes to propagate

Successfully received certificate.
Certificate is saved at: /etc/letsencrypt/live/tttt.ffff.lab.dsnw.dev/fullchain.pem
Key is saved at:         /etc/letsencrypt/live/tttt.ffff.lab.dsnw.dev/privkey.pem
This certificate expires on 2024-12-01.
These files will be updated when the certificate renews.
Certbot has set up a scheduled task to automatically renew this certificate in the background.

- - - - - - - - - - - - - - - - - - - - - - - - - - - - - - - - - - - - - - - -
If you like Certbot, please consider supporting our work by:
 * Donating to ISRG / Let's Encrypt:   https://letsencrypt.org/donate
 * Donating to EFF:                    https://eff.org/donate-le
- - - - - - - - - - - - - - - - - - - - - - - - - - - - - - - - - - - - - - - -
Caddy
Caddy setup is a bit simpler, you need to download Caddy with the RFC2136 plugin. You can either do that using the xcaddy utility or simply download it from here: Caddy with RFC2136 pre-selected
The plugin is already selected, you can just click “Download”
Once you have Caddy with the proper plugin, the Caddyfile section for TLS looks like this:
  tls {
    dns rfc2136 {
        key_name "<username>"
        key_alg "hmac-sha256"
        key "<tsig key>"
        server "ns.lab.dsnw.dev:5355"
    }
  }
Make sure to replace <username> and <tsig key> with values from your welcome email. Include this in the Server block where you need a TLS certificate
After updating your Caddyfile, you can start Caddy with something like caddy run and you should see a similar output to the one below:
2024/09/01 19:37:44.040	INFO	tls.issuance.acme.acme_client	trying to solve challenge	{"identifier": "test.ffff.lab.dsnw.dev", "challenge_type": "dns-01", "ca": "https://acme-v02.api.letsencrypt.org/directory"}
2024/09/01 19:37:47.604	INFO  tls.issuance.acme.acme_client	authorization finalized	{"identifier": "test.ffff.lab.dsnw.dev", "authz_status": "valid"}
2024/09/01 19:37:47.606	INFO	tls.issuance.acme.acme_client	validations succeeded; finalizing order	{"order": "https://acme-v02.api.letsencrypt.org/acme/order/1923213016/301443140866"}
2024/09/01 19:37:48.624	INFO	tls.issuance.acme.acme_client	got renewal info	{"names": ["test.ffff.lab.dsnw.dev"], "window_start": "2024/10/30 18:58:46.333", "window_end": "2024/11/01 18:58:46.333", "selected_time": "2024/11/01 08:48:17.000", "recheck_after": "2024/09/02 01:37:48.624", "explanation_url": ""}
2024/09/01 19:37:48.964	INFO	tls.issuance.acme.acme_client	got renewal info	{"names": ["test.ffff.lab.dsnw.dev"], "window_start": "2024/10/30 18:58:46.333", "window_end": "2024/11/01 18:58:46.333", "selected_time": "2024/10/31 22:07:45.000", "recheck_after": "2024/09/02 01:37:48.964", "explanation_url": ""}
2024/09/01 19:37:48.967	INFO	tls.issuance.acme.acme_client	successfully downloaded available certificate chains	{"count": 2, "first_url": "https://acme-v02.api.letsencrypt.org/acme/cert/03b10cce02a119144734340f54f7f5f47edc"}
2024/09/01 19:37:48.971	INFO	tls.obtain	certificate obtained successfully	{"identifier": "test.ffff.lab.dsnw.dev", "issuer": "acme-v02.api.letsencrypt.org-directory"}
Terraform w/ Openstack
You can use the Openstack Provider with Tofu/Terraform to manage the lab environment with IaC.
Docs for the provider itself can be found here: Terraform Registry
You will need to source the OpenRC file, you can check how to do that here.
Here’s an example of a basic setup (Network, Subnet, Router) with the Openstack provider in Terraform where all openstack provider options are pulled from the environment which we sourced with the OpenRC file:
provider "openstack" {
}

resource "openstack_networking_network_v2" "net-1" {
  name           = "net-1"
}

resource "openstack_networking_subnet_v2" "subnet-1" {
  name       = "subnet-1"
  network_id = openstack_networking_network_v2.net-1.id
  cidr       = "10.10.10.0/24"
  ip_version = 4
}

resource "openstack_networking_router_v2" "rtr-1" {
  name                = "rtr-1"
  external_network_id = "9d702c95-0330-4108-b93d-001e7c4cd00d"
}

resource "openstack_networking_router_interface_v2" "rtr-subnet-1" {
  router_id = openstack_networking_router_v2.rtr-1.id
  subnet_id = openstack_networking_subnet_v2.subnet-1.id
}
Run the following to get everything initialized properly (if you haven’t do it already) and then apply:
terraform init
terraform apply